Showing posts with label craft. Show all posts

Wednesday, November 27, 2013

California's Pilgrims

E. and J. have just finished their fall homeschool history project. JUST in time.


The girls tend to work from books for all their main classwork but for history we always make it a little more exciting with a topic project three or four times a year. We have made a medieval newspaper, had Roman feast for M.'s birthday and traveled the world with craft paper passports which get a "stamp" once a culture has been "visited".   Having just moved back to the states from a town on the south coast of England (only a little way away from Plymouth)  we have been studying the pilgrims and the Mayflower. To most Americans the idea of being completely ignorant of Pilgrim history probably seems incomprehensible but my kids were. 

Completely. Ignorant.


They have had such a great time researching and writing these diary. For example their characters existed and survived the first year in the New World when most of the immigrants died in the terrible conditions. Also E. and J. know where their characters settled married and how many children they had.  I had nothing to do with the research and writing (other than book buying/spotting and insisting on a minimum of ten diary entries) just the physical leather manufacture of their amazing Pilgrim Diaries.


We used regular printer paper aged and stained with coffee but not crumpled up a la fake treasure maps.  They wrote their diary entries leaving a good size margin on each page so that there was space to trim the paper down to fit leather sheet covers.  Which we punched with a bradawl tool and they stitched their diary up using leather thong.  They then wanted to mark the initials of the character on the cover. E. was Remember Allerton, and J. Mary Allerton. I didn't have the right tools but my girls really didn't care. A screwdriver did the job nicely.


The leather is rather expensive for a faux diary cover and only comes in one size from Michael's or Beverly's by us but a bigger one might have more options.  Having said that the work the girls put into writing up each entry, spell checking the lot and then by hand carefully re-writing them onto diary paper deserved a more noble finish than a fake leather or felt cover so I caved and bought the more expensive stuff.  In retrospect it was the very best thing I could have done. Children put value in the things their parents value.  By covering their work in leather I told them (inadvertently) that their work was worth something more than throwing away.  They are so proud and excited.  Just in time to share them with the family at Thanksgiving.


xx  Jo

Wednesday, August 7, 2013

The hip Victorian silhouette project

I love the trend for Victorian silhouettes that has come up in the last few years but the dull black leaves me a little uninspired and quite frankly makes me think of funerals. 


I also love to make mementos of my children at different stages of their life. Particularly a set of three showing all three girls at the same time. When the girls were little I did a set of their footprints all at once (ages 4 years/2 years/ 3 months) which were the things we most feared getting lost or broken in the move because they are irreplaceable and utterly priceless.


So here is my work in progress and a little (very very little and simple) how to:

You need:
1:  a digital camera and computer.
2:  tracing paper.
3:  a large enough piece of fabric to fit comfortably in an embroidery hoop of your chosen size. I used a 10 inch diameter hoop which is what I will display the portrait in long term as well, but you can mount it in a frame if that’s more your style.
4:  Your hoop
5: two coordinating pieces of felt- I used the acrylic kind that’s really cheap.
6: needle and thread in coordinating colours.
7: a stencil if you wish.

Seat your subject in a chair in front of a white, smooth  background (I hung a piece of paper on the wall) and shine as much light from every direction as possible. Take your photo and upload it to the computer. Size the photo on your screen to as big/ small as you fancy and trace your subjects profile onto tracing paper directly from the screen- carefully don’t press hard!!

Carefully cut out the profile- that’s your silhouette template. Cut out one exact copy from your top piece of felt and an enlarged (by only a ¼ to ½ an inch) copy from the bottom felt colour. It’s okay to be less precise on the bottom copy but try to keep the enlargement even all around the silhouette.
With your fabric in the hoop and your two felt silhouettes placed on top stitch in small even stitches all around the edge of the top silhouette.

If you are going to skip the stenciling- you are done.  Either cut away the excess fabric from your hoop or stitch it back behind and hang your portrait. Alternatively frame your beauty and make it look as proper as you choose!


For the stencilers… I am ashamed to show you the messy back of my work but I feel it is only fair to show you how I am adding pattern to my piece…  My stitching looks great at the front but is a 
PAR-TAY 
at the back….
***BLUSH***
I used a stencil which came as a set of three for free with a magazine and I traced my basic design onto the back of the outline of my stitching and added embellishment where it looked too bare.  


VoilĂ ! Hip Victorian Silhouette! 

 Use your template for other projects too. 
I used mine to make porcelain silhouettes which I hang in a group. They took (surprisingly) less time to make than the stitched versions. But you could use the template to cut sheet icing for a special birthday cake or to paint a drawer in a shared room  rather than putting names on the drawers.

Have fun!

xx Jo

Monday, August 5, 2013

The place I'm at when I should be doing something else...

Soooooo....  You know I've been busy. With lots of things.

I have the ABC's of busy...

-------------------
A is for Apples
 in the orchard- more than I can keep up with cooking, canning, feeding to my children, our neighbor's cows or the deer.


B is for Bird-sitting

 our chickens when they are out of their pen in order that the nasty bobcat that ate one doesn't get anymore!


C is for Canning

because I planted too much veg, inherited too many fruit trees and generally got too ambitious when ordering peaches via our friends at Live Power Community Farm with our CSA (Community Sustained Agriculture... its a mouthful to say and eat) box.


--------------------------------


The alphabet goes on and on and on (like Gone With the Wind but with no war, elegant dresses or Rhet Butler ... just lots of me looking flustered and throwing tantrums about someone messing up the quilt draped artistically over the back of the couch AGAIN!!!!!) finally ending in:

------------------------------

Z is for Zombie*

...sometimes... sort of... not really...
but M. sometimes acts like one.  He has been really really busy too and starts talking about going to bed the moment the children are up the stairs to go to sleep at 9 p.m. Naturally my instinct is to rebel and go to bed at 3 a.m. so I'm kinda a zombie too some mornings. 

*no photos of "Z" for the protection of the innocent

------------------------

  but the letter that has been consuming my time and mental space is S.


-----------------------

S is for Sweet Little Wood

and Shop!  I am officially set up in a beautiful shop called Gin'Gillie's Vintage Home Collective in Gyserville California!


---------------------------

When we left England we had some idea of opening a vintage/handmade sales space of some kind but we were uncertain of what exactly we wanted to do and more importantly where! I have a space on Etsy but in order to make it work you need a large-ish shop and really you have to push yourself to be proactive in order to keep your listings popping up because there are so (I cannot stress this enough) SOOOOOOOOO many sellers on Etsy. 

So the reasons Etsy is not really for me are that I am: 
1: too lazy. 
2: too annoyed/terrified by the postal system in the USA. 
3: to lazy


So this is what I enjoy doing. I find stuff. Old busted (sometimes) not really loved stuff. I take it home buff it up and show it I love it and then put it where someone else might pick it up and decide they love it too. Then I spend time with my family and make stuff I love with my hands... while the kids do homeschool... while I wait for the twelve jars in my canning pot to get to the right temperature... while I sit and wait for yet another interminable visit to the orthodontist to end...  while I inwardly gripe that M. has gone to bed at 9:01 and I'm not anything like tired yet.  Then I put that handmade stuff where someone else might pick it up and decide they love it too.


The long and short of it all is that when I should be watering watermelons that are taking over the back acre, keeping my little chickies from going stir-crazy in their pen, or sleeping with my husband at 11 o'clock.:  I can often be seen thinking about, designing, creating, washing, dusting, stitching, drawing or daydreaming about  Sweet Little Wood, my sweet little space that I can play with and make my own.

x(yz)  Jo


P.S. if you have never seen a tiny little baby watermelon...
 they are the cutest darn things ever!!

P.P.S. Does anyone know if apples are bad for cows?!?!

Friday, October 19, 2012

The Jubilee Quilt

Introducing 
(drum roll please- or maybe a fairground organ like you get a British fairs)

The Jubilee Quilt!!!

(terrible photo, sorry- how do you photograph a 7 foot quilt??)
 
Perfect for cozy moments nestled with a hot chocolate and Pride and Prejudice while the rain taps against the windows and the sun has put itself to bed early for the night.
 
It has also been perfect for procrastinating doing things like ironing M.'s work shirts and hoovering the carpets! Not to mention making dinner for the family or washing my hair!
 
This is my first quilt in about eight years.  Note the lack of piecing... ahem... I chickened out of that bit.  However also note the plethora of applique! I started with one patch (the Corgi in a crown) and enjoyed it soooooooo much I had to just keep going. Then there is the freestyle machine embroidery... Kristy Alsop called it the "crack cocaine of the sewing world" and I totally agree. I settled with my new sewing machine, a piece of fabric and an embroidery hoop thinking I would just have a go at a little machine sketching and five minutes later I had finished the London sky line block! Its satisfyingly quick and creative, allowing a sense of freedom you rarely get when sat before a sewing machine!
 
A London Mayor
A Wee Highland Cow

Since we decided to move to the states I've been feeling nostalgic about all the little things in the UK that I will miss. Thus The Jubilee Quilt was born of all those little lovely quirky that I will miss. For example:  what other place can you find a cow that looks just like the Mayor of the capital city? Seriously.
So The Jubilee Quilt is full of things I love: Big Ben, postage stamps with the queen's profile, red squirrels, hedgehogs, foxes, castles, post boxes, red phone booths and the London sky line. 
It has Highland Cows too but (sorry Boris Johnson) no Mayor of London.
 I've adored and continue to adore two special little critters in the quilt. LOOK at those! Does anything get cuter than a red squirrel's tufty ears? Like armadillos you see hedgehogs more often spread several feet across the road but this little guy looks just like the fellow that wandered into our garden a few weeks ago. I picked him up (much to M.'s horror as he moans "They have mites!!") and he squirmed then stopped and just stared at me. When I put him down- cause they are surprisingly prickly- he did this funny little "keep your eyes on the predator" shuffle away from me. So that is what my quilted hedgehog is up to.
 
It took a little thinking to decide what time Big Ben should read right in the center of the quilt. In the end it was M.'s very clever idea for it to read 8:12. It is not a significant time of day for us for any reason but it makes a tiny little puzzle for those of you who would like to work it out.
 
x Jo


Monday, March 26, 2012

Follow the White Rabbit

Things are getting curiouser and curiouser around here.

  
Kitty turns 13 years old very shortly and we are expecting her cousin and best friend (Ruth) down for a few days with her mother (the loveliest most gentle person I know) and we are so excited. Kitty didn't want a party as such she just wanted to spend some time with Ruth and when her mum suggested they both come down for a few days visit it was the perfect opportunity to get together.


I've been secretly planning an Alice in Wonderland party for some time since we took out the stunning book Paper Cuts by Taylor Haggerty from the library. So while the girls were recently with their grandparents for a little break I cracked out the pva glue and string and started to create a little bit of wonderland for our home.

The White Rabbit:


This scrumptious little man is a Lindt chocolate rabbit. A middle size one (500g) which this time of year are fairly easy to come by in a large supermarket. I wrapped him well in cling film so that there was no chance for the PVA glue and acrylic paint to taint the chocolate. I then paper mache'd him up with a layer of white tissue using Decopatch glossy glue; a little slightly thinned PVA glue would have been cheaper and just as good but I had the decopatch to hand and I didn't have the PVA. Because white tissue is so transparent when used like this I then covered him with a layer of white acrylic paint followed with a final layer of white tissue and glue once the paint had dried.
His snappy little suit I painted on using acrylics in two shades of green, blue, brown and a tiny bit of yellow for his buttons. I based it on John Tenniel's original illustrations of the white rabbit.

The straws and gift bags:


Sourced from the lovely products at Project Pretty She will personalize flags and stickers for the bags and straws but I chose to make my own eat me/ drink me tags from Cath Kidston stickers I had hanging around.
  

This adorable fellow is a friend of the Mad Hatter and likes to sleep in tea pots. He came from the wonderfully creative Etsy shop Quernus Crafts and has been resident with us for only a few weeks.

X Jo

Wednesday, March 14, 2012

Hands free

I like to carry my smart phone with me everywhere.


Not because I get calls... I get one or two a day (almost always from Matt).


Not because I have interesting apps (Windows 7 phone- was great but now getting a bit glitchy).


I just love it's carry case!!!
This was cross stitched onto cream evenweave and then just sewn with a felt lining to the right size with a ribbon for carrying. The design is by Kerry Morgan and can be found in Cross Stitcher isssue 247.  It has this adorable title line which you can personalize. Mine says "California Dreaming" and who can resist a classic? Not to mention; I do... dream of CA that is.

I love it. I don't have to scrabble in my bag looking for it, forgetting it on coffee shop tables, setting it down somewhere in the house where it disappears into the background because of the bland black colour, or (and yes sadly I have done this before) put it in my pocket where it slips out just as I go to use the loo!! No not for me because... THERE! SEE IT? My phone hangs sweetly from my wrist. 

I got approached by a bloke in the music industry who wanted me to make him some (500) to include with parcels he wanted to send out. After controlling my initial surprise and telling him it wasn't my design to sell I asked him how much he thought it was worth per item... Well let me just say that men in the music industry clearly have no clue how long it takes to produce a small cross stitch pattern because his assumption was grossly undervaluing my time not to mention Kerry's lovely design! 

So if you see me strolling down the sidewalk with my arm waving in the air crazily: I'm not hitchhiking/distressed/mad/having a heart attack. I just want everyone to look at my uber-awesome phone case!

X  Jo


Friday, November 4, 2011

Gifting creativly

So as a follow up to my last post there is this: We make a set of these sketch books every year for Christmas and they are a perennial favorite! The gold stencilled version is what all our girls will receive and the titled version is what our young nephews will get this year as we are all going to be together for New Year.

These really could not be easier. I buy cheap A4 hard back sketch books this time of year. Last year I got nice ones for £1.99 each. This year I've had to fork out £2.50 each. The titled version is lettered by hand in pencil and then painted over (also by hand) but you could very easily use letter stencils to put words on your books. The stencilled version is new this year as I felt I'd worn out the titled ones for our girls over the last few Christmases. If anything the stencil is easier. You just need a piece of lace paper. A paper doily would work nicely but I've used some scrapbook paper that was not cheap at £1.80 for the sheet but it was so sturdy I've done three books and it could stand up to a lot more use still. Good quality acrylic paint works a treat but don’t be tempted to try the kid’s paints (poster or otherwise) on them as it flakes off over time and you will find yourself one day covered in chipped paint and the book looking rather less spectacular. I placed a letter cut out of the child’s initial under my lacy card and used a sponge to stipple gold paint all over the front of the book then the card and initial removed and voila! The spine was painted gold and when dry about an hour later I wrote in in black Sharpie each child’s name so that when being pulled off a shelf it would be immediately recognizable whose sketch book is whose. I haven’t painted the back as I think it’s easier for younger children to recognize front from back with a plain back cover- but I could imagine how much more glamorous a whole gold painted book could look!

Thursday, September 22, 2011

Selling my soul

This could be the most terrifying thing I've ever done: it does feel like I've just put my soul up for the whole world to gaze on and judge. So **gulp** go visit my Esty shop, I'm not sure if I care if anything sells, I just hope nobody goes "Oh would you look at that rubbish!"
Here goes. . . SOUL FOR SALE! ! !

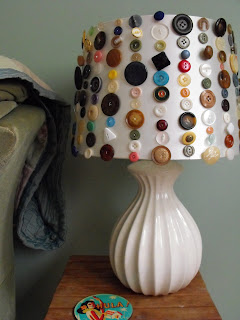
On another subject: I am finally getting a few projects finished at last. And my beautiful lamp which once was rather boring and plain is now a smorgasbord of buttony goodness! !

I had seen this on a lamp where they had used just the metal frame of the shade and had the light through strung/wired (?) buttons. However the light in our lamp is something like 6 gazillion candle power and will fry your eyeballs if it hits you right on so I decided to sew the buttons to the shade. With the light off it looks like I like: kinda grungy and handmade-ish but in the evening it turns into the star of our living room. Buttons which previously looked normal turn into the most stunning visual feast.I didn’t use any special bits, I purposely used buttons I was going to donate to a charity shop because they were so very ordinary.
yum yum yum yum!
For any who might be interested we are planning a trip WEST!! It is going to happen in 2012 it is just a matter of when the tickets aren't going to be totally out of proportion due to the Olympics being a couple of hours away from our house. Okay must stop before I hyperventilate with excitement.

Tuesday, September 20, 2011

Pottery love

Last night was my first evening in an 8 week ceramics and pottery class which M. gave me for my birthday. I've never really had a drive to do ceramics. I keep myself neck deep in projects that need finished without the necessity of three days cooking in extreme temperatures (thank you very much). Needless to say as people moved into the ceramics room and were chatting like old friends and began to raid cupboards and pull out almost finished pieces I began to have a creeping sense of how wrong this class could be for me. And I wished for a sinking hole in the earth to swallow me and save me the embarrassment of admitting my ignorance. HOWEVER…

Oh my giddy wonderful racing heart!! I LOVE it!

I was encouraged to start with moulding but. . . err. . . being a bit hard headed and not having been at all interested in doing moulded clay I said with total ignorance of the processes, limitations, and qualities of clay "No I want to either throw or do sculptural stuff." So I was sat down with a piece of paper and pencil which is no hardship as sketching is my favourite diversion.

What came out was a regurgitation of something that I have been sketching on the borders of notebooks and corners of sticky pads for at least 16 years. This (above) is the earliest sketch I have of it which is from 2002 but it has been bouncing around my head for much longer. Then I sat with clay and just did what I had in my head. And it was so peaceful and soul centring, like a meditation on form and touch. I sense that I could have closed my eyes and felt what the clay wanted me to do with it. I learned a few things about the process and how to make sure my piece doesn't crack in the kiln or take four years to dry for that matter.

I cannot wait till next week. I have a coral reef in my head and hands which is burning to escape and become tangible!

As a BIG aside I am about to go onto ETSY and see if my makes are as nice to anyone other than me. . . eeeek! This embroidered broach (modelled by my obliging but terribly embarrassed 12 year old) is one of the few things I have to sell. It is slightly larger than life size and a Peacock butterfly which is very common in our area of England. It will be on sale in a day or two. Wish me luck!